How to Build a Kitchen Island Out of Cabinets
Learn how to build a large DIY rustic farmhouse kitchen island from scratch with my plans. Resembling an old wood antique general store counter, this easy-to-build island provides additional storage with seating for 4 to 6 people.
Rustic DIY Wood Kitchen Islands
We recently remodeled the kitchen in our double-wide manufactured home and added new white country kitchen cabinets. Then, I debated whether I wanted a kitchen island for plenty of additional storage, larger work space, and a focal point in our home.
After several recent trips to antique shops, my eyes were drawn to the look and style of old rustic general store counter design. Made with solid wood, and distinctive character, they were built to last a lifetime.
The price range for authentic old, antique general store counters is out of budget for my idea of affordable. I began sketching out ideas. I sketched plans that I felt were going to be easy yet simple and affordable to build. With the help of my children, we built this beautiful rustic farmhouse kitchen island.

How Much Does it Cost to Build Rustic Style Farmhouse Kitchen Islands
The cost to build a rustic farmhouse kitchen island is going to vary. Depending on lumber prices, the kind of lumber you choose to buy, the style, and how large you build one. A DIY kitchen island could be made from old barn wood or old pallet wood and reclaimed wood for a unique look.
To build this DIY island, for all of my supplies, cost me around $300. To keep the cost down for my kitchen island, I chose to use rough-cut eastern pine 1x12x16 boards from my local lumber store.
Most big lumber stores have an option to pay a little extra to have the boards cut, and it was well worth the cost. Having them cut the boards to 8-foot lengths made them easier for me to handle. Once home, I then ripped the boards to the sizes that I needed.
Are Farmhouse Style Kitchen Islands Still in Style
Many trends seem to come and go in the kitchen decorating and remodeling world. Farmhouse kitchen rustic islands seem to be a trend that stays in style. An island in a large or small kitchen space is the hub of the home, providing seating and plenty of extra storage space.

- Table Saw
- Miter Saw
- Tape Measure
- Sander
- Hammer
- Level
- Pencil
Materials You Need for Building a Rustic Farmhouse Wood Kitchen Island
- 2x4x8 boards
- vertical plank boards
- shelf boards
- trim boards
- boards for holding open shelves
- 2″ #8 wood screws
- 3/8″ drive impact
- nails – I chose to use these to attach the trim and countertop. I like the old primitive feel that it gives the island.
- Paint – I used Pine Needle from True Value (later changed to Accessible Beige by Sherwin Williams)
- Stain – I used Minwax Coffee Gel Stain (later changed to TriCorn Black by Sherwin Williams)
- Matte Finish (polycrylic or wax) – to protect the paint

Rustic Style Kitchen Islands Video
I created this video so that you will see the steps that I took to build this rustic farmhouse style island if you are a visual individual like myself. This was my first time building something this large, and I built it from a simple sketch that I drew out on paper.
In the video, you will see that I build the top as one of the first steps. I quickly realized this was a mistake. It should have been the last step, as this would have made building the open shelves easier. A few times, I had to take apart a section that I had previously done to correct a mistake. It's not perfect, but I am okay with that since I like the rustic look. It was also a great project for the children to help out with.
I am a bit sporadic, and you will notice that I work on various aspects of the island at different times. Again, I built this from a vision I had in my mind. Let the video serve as inspiration.
How to Build a DIY Rustic Farmhouse Kitchen Island
First of all, let me say I am not a furniture builder. I am sure that there are many ways to build a kitchen island and do it much more professionally than I have. However, I am a visual creator with a vision in my head who creates as I go. I used what tools I had on hand, used lumber I could afford, and built what I envisioned in my mind.
This tutorial is meant to serve as inspiration. While I step you through how I made my own, your measurements will differ depending on the size you need for your kitchen.
I hope that if this tutorial inspires you, you will know that you can build your own kitchen island and be proud of it! Here are the steps I took to build a large DIY rustic farmhouse kitchen island from scratch for our kitchen.


Base and Top Support Pieces
To determine how long and wide you need to build the base and top framing, you will need to know how large you want your kitchen island. Once you have determined the size you want, you can begin cutting the 2×4 boards for the base.
Cut (4) 2×4 boards to the length that you want your island. Two of the longer 2×4 boards will be for the base frame, and the other two will be for the top frame. Then cut (8) 2×4 pieces to the width that you want the kitchen island. Keep in mind that you will be adding the vertical slats and trim, which will add about 2 inches to the overall measurements.
To assemble the base and top frame, screw the four shorter 2×4 boards between the two longer 2×4 boards, as shown in the photo above. You can also use wood glue as we do in the video if you so choose.
Be sure that the shorter boards are the same distance apart on both the base and top frame. The base frame and top frame should match exactly.
Build Side Walls
To build the sidewalls for the large kitchen island, I used a table saw to rip my boards to the width that I needed. I was working with boards that were 11″ wide. I ripped them to 5.5″ wide and cut them to 31.5 inches tall. Mine was ripped to 5″ inches to fit the end space. The last boards on the sides may need to be ripped to a smaller width to fit the space.
I attached the boards by using a screw to attach the vertical plank boards to the 2×4. To create the gap between the boards, I used a ruler as my spacer.

Connect the Top Frame
To connect the top frame, I suggest having another person help hold the frame. Screw each vertical plank sideboard to the top edge of the 2×4 frame. I found it easiest to start putting the screws into the plank boards, then line up the top frame and finish screwing the screws in.
I could then hold the frame with my knee and use the ruler to get the same gap as I did at the bottom. Do this for both sides of the island. Then, use a level to make sure that the top and all of the sides are level.
Build the Back Wall
To build the back wall, cut the vertical planks to the same size as those on the sides. Attach them to the 2×4 frame on the top and bottom with screws. I started with the middle of the frame and attached the first vertical plank. I then used a level to make sure that the board was straight.
Continue attaching the vertical planks working to the end. Once I got to the end, I had to measure the width of the last boards and cut them to size.

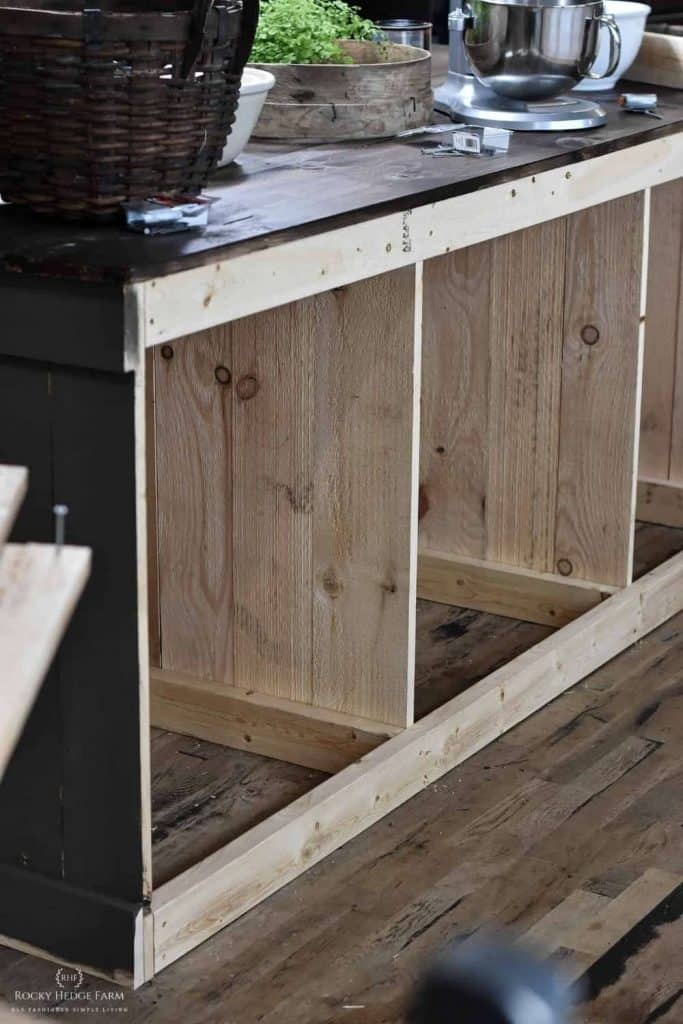
Build Middle Frame Walls
The photos above show one of the first mistakes I made in building the island. I attached the top sooner than I should have. I also built the floor of the island before I should have. So, I had to take it back out to build the middle frame walls. So, disregard building the top and that bottom shelf as one of the first steps.
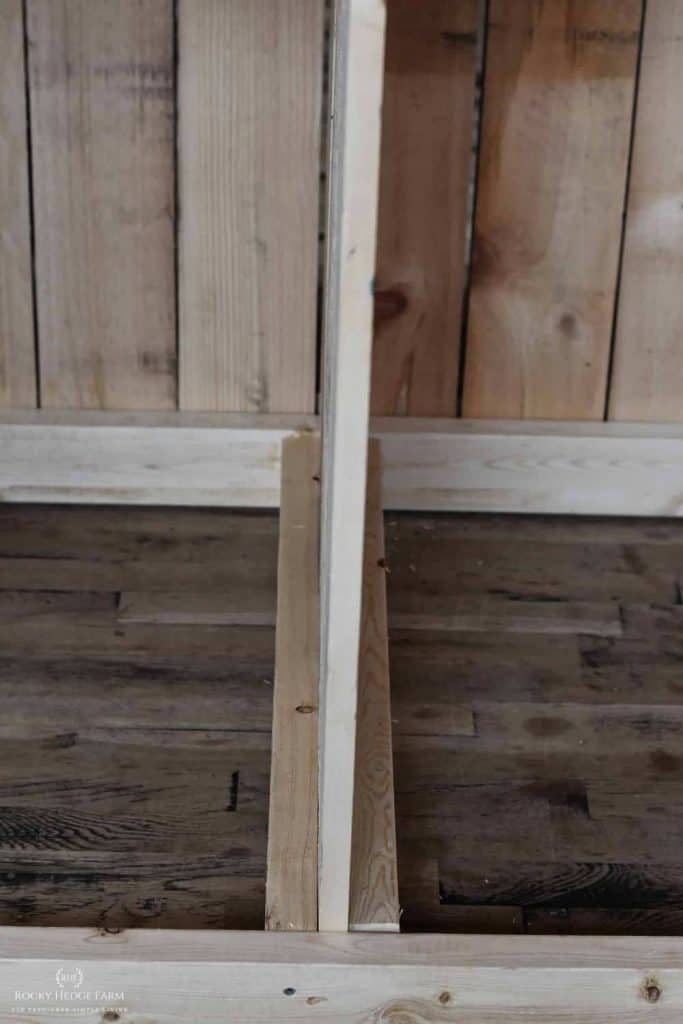
To build the middle frame walls, measure how tall your vertical planks need to be. Then attach the planks with screws to the 2×4 on the top of the frame and the 2×4 on the bottom of the frame. Then, add another 2×4 on either side of the middle frame walls. This is where you will attach the boards to create the middle shelf.

Build Bottom Shelf
To build the bottom shelf, measure the length of the boards between each wall section. The boards can be attached, starting at the back of the cabinet, by using screws. Do this for each of the three storage sections of the island to create the bottom shelf.
I suggest painting the interior of the island before adding the top shelf. The back and side walls can be hard to reach once the shelf is in place.

Build Top Shelf
To build the top shelf, determine where the shelf needs to be placed. I used several large kitchen items to help me decide the height of my shelf space.
Cut (6) 1×2 to the length of the sidewall and attach them with screws to the walls that will hold the shelves. If you find that your board tends to split when putting the screw in, pre-drill a hole using a drill bit. You can see us do this in the video, as we had this issue.
Measure how long the boards need to be to create the shelf. They should be the same length as the ones that were on the bottom shelf sections. Attach them with screws and/or wood glue.
Add DIY Kitchen Island Countertop
The counter top will need to be added as the last step. One of the mistakes I made was building and attaching it too quickly. This made it more difficult to work on the island's inside and get the painting done.
For the large spacious countertop, I used boards of various widths to create the top. On each side, I left a two-inch overhang. There is a three-inch overhang on the front, and on the back, there is a two-inch. This was just my personal preference, and this is an adjustment that anyone can make to best suit their space.

Add Trim
As one of the last steps, add the trim. For each trim piece, we measured and cut or ripped boards to the size needed using the table saw. The trim on the top and bottom of the sides, front and back, is 4.5″ wide. We attached trim at each corner using 1×2 boards. On the back of the island where the shelves are, we cut a piece of wood board to cover the edge of the top shelf and the vertical boards.
Stain or Paint
For the DIY rustic farmhouse kitchen island, I chose to use a beautiful green color called Pine Needle that I found at my local True Value store. I used the paint on every section except the countertop. The stain on the countertop is from Minwax and is the Gel stain color called coffee.
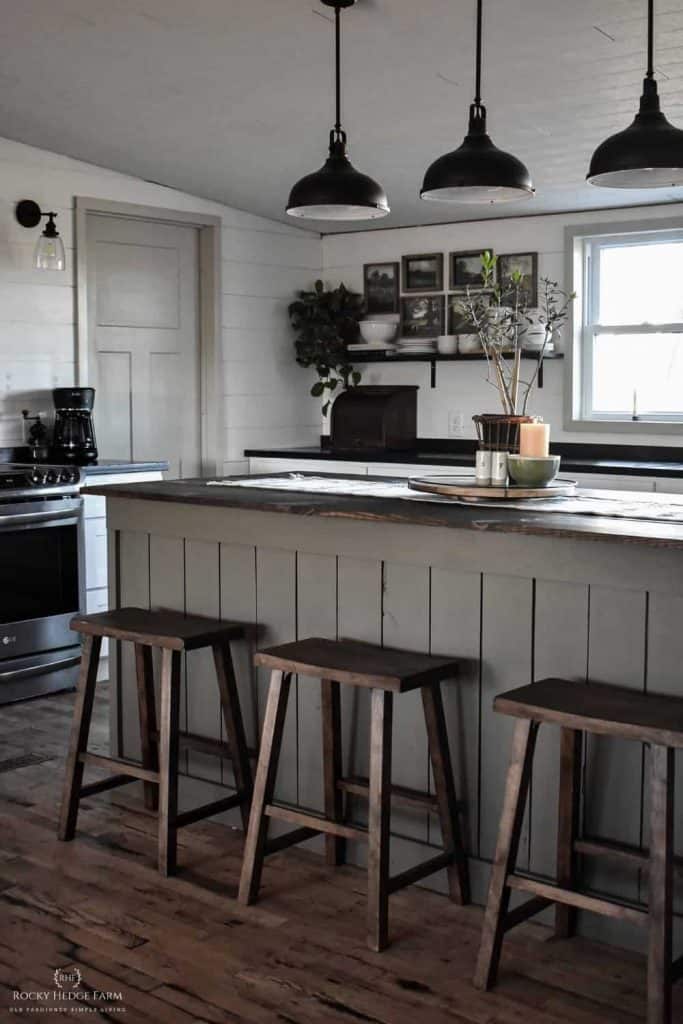
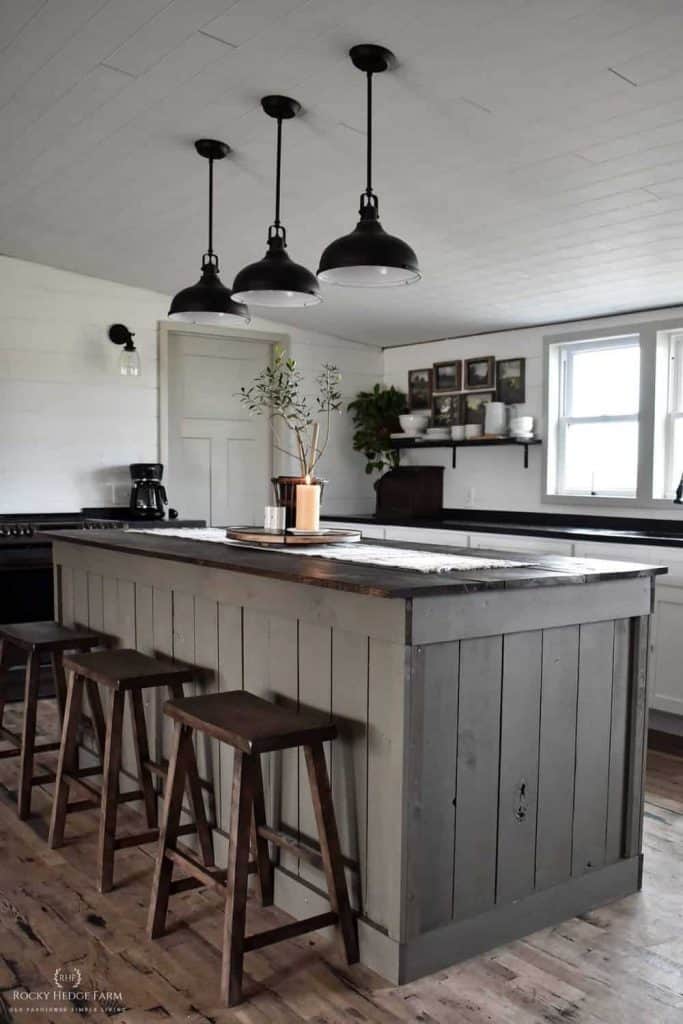
Large Farmhouse Kitchen Island with Seating
A large kitchen island with seating for 4 to 6 is the perfect size for our family. I have been looking for an old antique wooden rustic kitchen island stool set in great condition and useable. So far, I have only been able to find one.
There are plenty of rustic kitchen island stools to choose from, but I could not find antique ones in good condition, so I purchased the 24-inch saddle seat stool, unfinished.
I stained the stools in a rich honey finish, for the time being, using the same stain that I used for the top of the rustic kitchen island. In the future, I plan to give them a makeover using the DIY version like Jenna Sue used for her wood stool.

Kitchen Island Features with Plenty of Storage
Building a rustic farmhouse kitchen island was a great way to add rustic beauty to our large space. The island has given us additional space for storage and a larger counter space for food preparation. It is also a gathering place to play games, do school work or eat and drink with friends and family.
I look forward to piling the countertop full of garden-fresh vegetables in the summer, baking cookies, fresh bread, and seeing the top filled with full canning jars later in the year. The kitchen island is definitely a solid piece that has become the central hub of our home and a space that serves us well.

What is Stored Under my Kitchen Island
this post contains affiliate links
- Cutting Board – a true essential in my kitchen. I use them on a daily basis for chopping vegetables to sitting my hot cast iron skillets on them.
- Vintage Mixing Bowls – some of my favorite mixing bowl sets have come from antique shops. My mixing bowls have a heavy stoneware feel and I use them on a daily basis. There are several great options available online, including these Ohio Stoneware bowls.
- Antique Sifter – this was a recent find from the antique shop. I thought about hanging it on the wall but after building the island, I realized it was the perfect place to hide my potatoes and onions. It keeps them out of site but within easy reach.
- Wooden Bowl – pretty antique finds that are worthy of holding farm fresh garden produce or fruits and vegetables.
- Large Antique Basket – this was a recent purchase from Etsy. Underneath the pretty 100% linen hand towels is all of my canning lids.
- Mixer – another kitchen essential that I use often. I like that it can be stored out of the way and off the kitchen counter now that I have a kitchen island with a lot of storage space.
- Cast Iron Skillet Rack with Skillets – this was a recent purchase that I am not sure how I have lived without for so long. Nearly ever meal I cook, utilizes a cast iron skillet. Generally, the skillets are on the stove or in the oven, but this provides a way to store them between use.
What is Stored on My Kitchen Island
- Lazy Susan
- Salt and Pepper Shakers
- Olive Tree
- Beeswax Candle

Tips for Building a DIY Rustic Farmhouse Kitchen Island
- Be sure that the base and top frame are built to the same dimensions. This is important when it comes time to add the vertical walls on the inside to create the storage sections.
- Paint the inside sections after building the bottom shelf. It can be hard to paint the back wall once the top shelf is in place.
- Put the countertop on last. You will see in the video, that I did not do this. It made it more difficult to work on building the inside as well as making it more difficult to paint.
- Do not be afraid of making mistakes. It happened to me several times and it is bound to happen to everyone. I corrected my mistakes and moved on.
Updated: White Kitchen Island
After living with the beautiful green paint color on the rustic island, I felt like I needed to change the color scheme to different color that matched my home style a little more. The creamy white paint color is called Accessible Beige and can be found at Sherwin Williams. The top was then painted Tricorn Black, also by Sherwin Williams.

click bulleted titles below to be taken directly to the post
- Our Kitchen Remodel Plan
- Gutting our Kitchen
- Adding New Windows in the Kitchen
- Building Kitchen Cabinets
- DIY Countertops
- Covering the Kitchen Ceilings

Materials
- 2x4x8 boards
- vertical plank boards
- shelf boards
- trim boards
- boards for holding shelves
- 2″ #8 wood screws
- 3/8″ drive impact
- nails – I chose to use these to attach the trim and countertop. I like the old primitive feel that it gives the island.
- Paint – I used Pine Needle from True Value (later painted Accessible Beige from Sherwin Williams)
- Stain – I used Minwax Coffee Gel Stain (the top was later painted Tricorn Black from Sherwin Williams)
- Matte Finish (polycrylic or wax) – to protect the paint
Tools
- Table Saw
- Miter Saw
- Tape Measure
- Sander
- Hammer
- Level
- Pencil
Instructions
Base and Top Framing
To determine how long and wide you need to build the base and top framing, you will need to know how large you want your kitchen island. Once you have determined the size you want, you can begin cutting the 2×4 boards for the base.
Cut (4) 2×4 boards to the length that you want your island. Two of the longer 2×4 boards will be for the base frame, and the other two will be for the top frame. Then cut (8) 2×4 pieces to the width that you want the kitchen island. Keep in mind that you will be adding the vertical slats and trim, which will add about 2 inches to the overall measurements.
To assemble the base and top frame, screw the four shorter 2×4 boards between the two longer 2×4 boards, as shown in the photo above. You can also use wood glue as we do in the video if you so choose.
Be sure that the shorter boards are the same distance apart on both the base and top frame. The base frame and top frame should match exactly.
Build Side Walls
To build the sidewalls for the large kitchen island, I used a table saw to rip my boards to the width that I needed. I was working with boards that were 11″ wide. I ripped them to 5.5″ wide and cut them to 31.5 inches tall. Mine was ripped to 5″ inches to fit the end space. The last boards on the sides may need to be ripped to a smaller width to fit the space.
I attached the boards by using a screw to attach the vertical plank boards to the 2×4. To create the gap between the boards, I used a ruler as my spacer.
Connect the Top Frame
To connect the top frame, I suggest having another person help hold the frame. Screw each vertical plank sideboard to the top edge of the 2×4 frame. I found it easiest to start putting the screws into the plank boards, then line up the top frame and finish screwing the screws in.
I could then hold the frame with my knee and use the ruler to get the same gap as I did at the bottom. Do this for both sides of the island. Then, use a level to make sure that the top and all of the sides are level.
Build the Back Wall
To build the back wall, cut the vertical planks to the same size as those on the sides. Attach them to the 2×4 frame on the top and bottom with screws. I started with the middle of the frame and attached the first vertical plank. I then used a level to make sure that the board was straight.
Continue attaching the vertical planks working to the end. Once I got to the end, I had to measure the width of the last boards and cut them to size.
Build Middle Frame Walls
To build the middle frame walls, measure how tall your vertical planks need to be. Then attach the planks with screws to the 2×4 on the top of the frame and the 2×4 on the bottom of the frame. Then, add another 2×4 on either side of the middle frame walls. This is where you will attach the boards to create the middle shelf.
Build Bottom Shelf
To build the bottom shelf, measure the length of the boards between each wall section. The boards can be attached, starting at the back of the cabinet, by using screws. Do this for each of the three storage sections of the island to create the bottom shelf.
Build Top Shelf
To build the top shelf, determine where the shelf needs to be placed. I used several large kitchen items to help me decide the height of my shelf space.
Cut (6) 1×2 to the length of the sidewall and attach them with screws to the walls that will hold the shelves. If you find that your board tends to split when putting the screw in, pre-drill a hole using a drill bit. You can see us do this in the video, as we had this issue.
Measure how long the boards need to be to create the shelf. They should be the same length as the ones that were on the bottom shelf sections. Attach them with screws and/or wood glue.
Add DIY Kitchen Island Countertop
The countertop will need to be added as the last step. One of the mistakes I made was building and attaching it too quickly. This made it more difficult to work on the island's inside and get the painting done.
For the large island countertop, I used boards of various widths to create the top. On each side, I left a two-inch overhang. There is a three-inch overhang on the front, and on the back, there is a two-inch. This was just my personal preference, and this is an adjustment that anyone can make to best suit their space.
Add Trim
As one of the last steps, add the trim. For each trim piece, we measured and cut or ripped boards to the size that was needed using the table saw. The trim on the top and bottom of the sides, front and back, is 4.5″ wide. We attached trim at each corner using 1×2 boards. On the back of the island where the shelves are, we cut a piece of wood board to cover the edge of the top shelf and the vertical boards.
Stain or Paint
For the DIY rustic farmhouse kitchen island, I chose to use a beautiful green color called Pine Needle that I found at my local True Value store. I used the paint on every section except the countertop. The stain on the countertop is from Minwax and is the Gel stain color called coffee.
How to Build a Kitchen Island Out of Cabinets
Source: https://www.rockyhedgefarm.com/how-to-build-a-diy-rustic-farmhouse-kitchen-island/
0 Response to "How to Build a Kitchen Island Out of Cabinets"
Post a Comment